

Raspberry Pi - OpenAuto
Turn Raspberry Pi into fully working Android Auto
In this tutorial you will learn how to make fully working Android Auto in your car using Raspberry Pi.
This project uses OpenAuto developed by f1x.studio (Michal Szwaj), but the OpenAuto development in Git lacks of proper tutorial and few more things, so here you will find complete tutorial to set up your own Android Auto using OpenAuto project with Raspberry Pi. You will also get few tips for proper hardware and software settings to make the OpenAuto more comfortable to use.
What you will need:
- Raspberry Pi 3 or 4
- Touch screen (any compatible with Raspberry Pi) – preferably 7″ with resolution 800×600 or 1024×600
- USB sound-card
- 12 VDC audio amplifier
- Microphone with 3.5 mm jack
- USB Bluetooth dongle
For this project the equipment used was:
- Raspberry Pi 3 model B (and tested also with Raspberry Pi 4)
- 1024*600 7”IPS Capacitive Touchscreen Display Monitor with HDMI interface and touch controlled via USB
- USB sound-card ADA-20 USB
- 12 VDC audio amplifier Xh-M145 Yamaha Digital Power Amplifier Board Class D
- Microphone with 3.5 mm jack
- Bluetooth dongle Gembird Mini USB Bluetooth
Hardware setup
Connect all the equipment as described in the picture below. It is strongly recommended to build your own power distribution board for 5 VDC using 12 VDC from car radio connector and DC-DC step-down from 12 V to 5 V. You can find example scheme here how you can build your 5 VDC power distribution USB board. If you are using USB charger in the car, make sure it can provide at least 2 A current for Raspberry Pi and at least 1 A current for Touch screen.
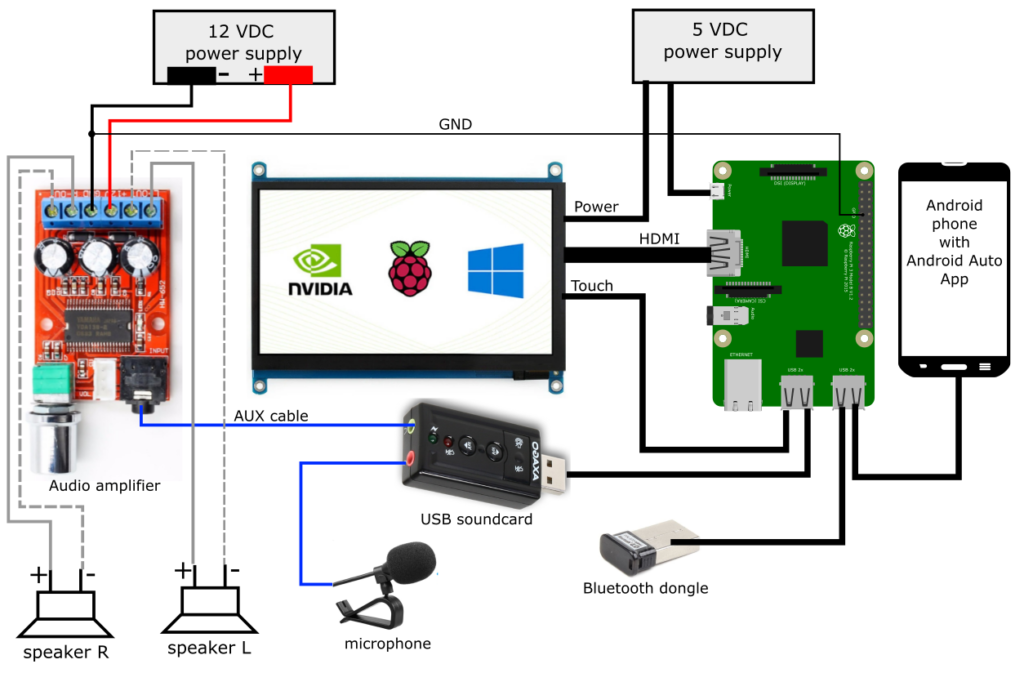
One very important thing if you are not using your own power distribution board for 5 VDC. Once you connect audio amplifier to 12 VDC, you have to connect GND pin of audio amplifier to GND pin on Raspberry Pi to make sure that 12 VDC and 5 VDC will be on the same ground to prevent from audio unwanted noise (hum, buzz).
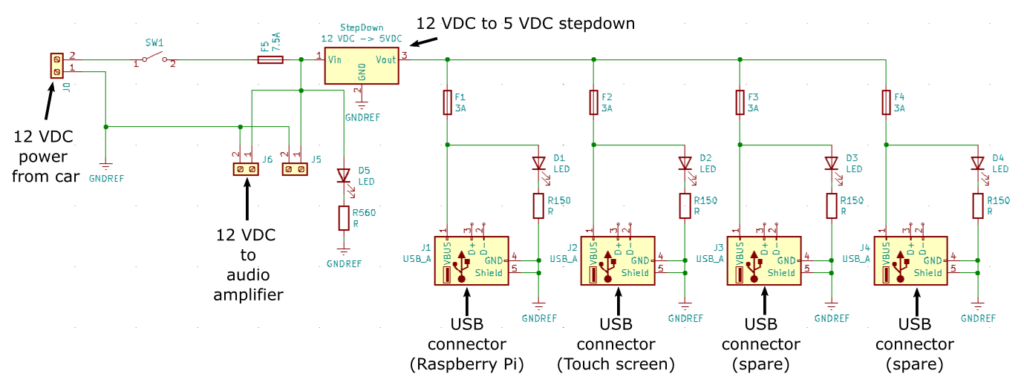
Optional: custom power distribution board
If you have some HW electronics skills it is better to build your own power distribution board using 12 VDC to 5 VDC step-down. You can get on 5 VDC connectors higher current if needed so then the power supply will be more stable in comparison to cheap USB car chargers (these usually can not achieve 2 A even if they claim it).
Software setup
If you want to save yourself some time you can download Raspberry Pi OS image already prepared by 747Developments with functional OpenAuto. You can flash the image to the card e.g. using Raspberry Pi Imager and start using OpenAuto immediately. Link to Raspberry Pi OS image with OpenAuto can be found here. OpenAuto app can be then opened clicking on the OpenAuto icon on the Desktop. NOTE: This image contains built version for 800 x 480 display (but this should work fine also with higher resolution displays) ad was tested on Raspberry Pi 3 and Raspberry Pi 4.
Of course you need to have Android phone with installed Android Auto App in your phone. In some countries there is not available Android Auto App in Google Play Store, but you can install it via .apk file downloaded e.g. from APK mirror.
If you want to install OpenAuto on you own and not to use prepared Raspberry Pi image, follow next steps in this chapter.
Install OpenAuto with required dependencies
At first download OpenAuto archive with all necessary dependencies, place it to the /home/pi/ directory (“pi” is default user – change it if you are using other username) of your Raspberry Pi and extract the content of the archive here. You should see now “openauto” folder in the /home/pi/ directory.
Make sure your Raspberry Pi is connected to the internet. Open the terminal and type:
cd openautosudo bash Installer_OpenAuto.sh
sudo ~/openauto/bin/autoapp
Or if you selected to create Desktop shortcut in the installation script and you are using default user “pi” you will be able to run the OpenAuto double-clicking on the Desktop icon.
OpenAuto settings
Before you open OpenAuto you might want to pair the bluetooth dongle with your Android phone. NOTE: Onboard Raspberry Pi bluetooth adapter is not working with Android phones, so you need to use external bluetooth USB dongle to pair the devices. Unfortunately phone calls sound have to go trough bluetooth in Android Auto if you want to use car speakers and microphone for calls.
To pair new device make sure that Raspberry Pi Bluetooth is discoverable (Right-click on the blueman icon and select “Make Discoverable”). In your android phone in bluetooth settings select Pair new device, select the Raspberry Pi’s USB dongle once it is found and pair it. After pairing is successful you need to get MAC address of the USB bluetooth dongle in your Raspberry Pi. So open the terminal and type:
hciconfig -a
This will list your Bluetooth adapter information – write down the BD address in format XX:XX:XX:XX:XX:XX
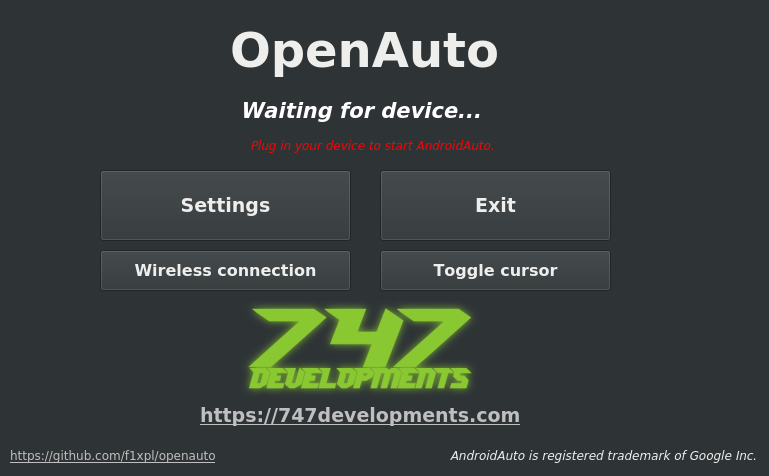
Now you can open the OpenAuto app (either using Desktop shortcut or using command “sudo ~/openauto/bin/autoapp“)
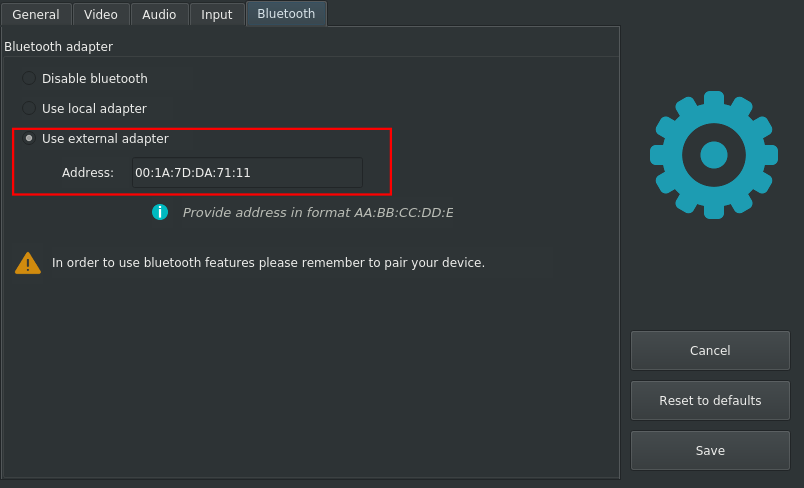
Go to Settings and set your Video preferences on “Video” tab like resolution and Frame rate. On “Audio” tab make sure that USB sound-card is set for input and output device. On “Input” tab make sure you have enabled touchscreen and finally go to “Bluetooth” tab. Here it is important to select “Use external adapter” and to the “Address” field put the MAC address of the USB dongle you got before.
At this point you should be all set and you can connect your Android phone to your Raspberry Pi via USB cable. The OpenAuto should automatically detect the phone and it should switch to Android Auto environment. If you have any troubles you might take a look in the “Tips and Troubleshooting” section.
Tips and Troubleshooting
Here you can find few tips to make OpenAuto more comfortable to use with touch screen. Most of these tips are already included in the pre-built Raspberry OS images with OpenAuto.
1. Enlarge icons and enable single click operations
Open File manager, in file manager go to:
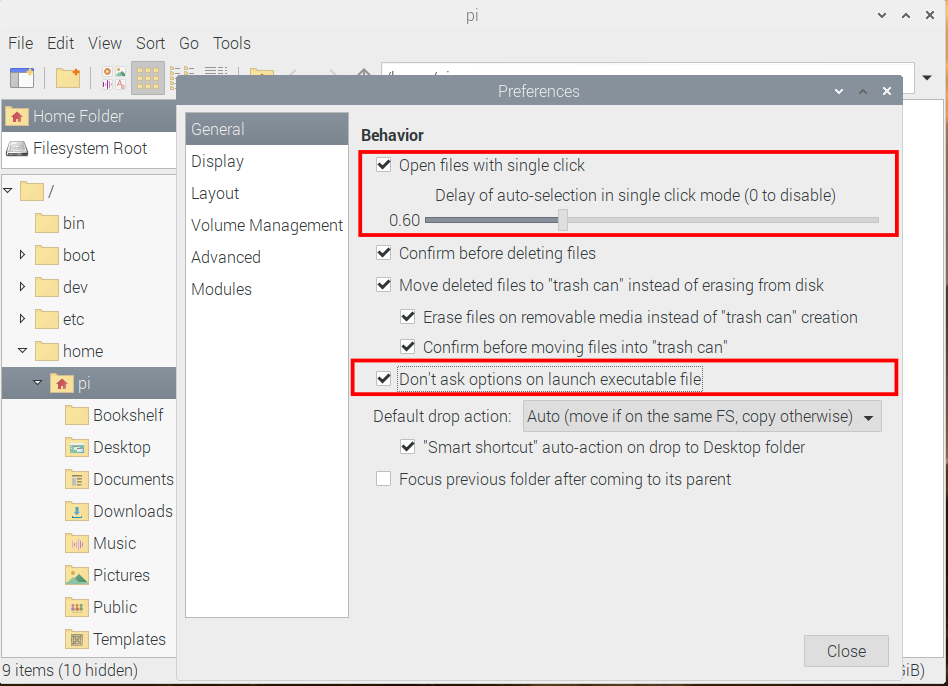
- Edit -> Preferences -> General:
- Mark option ”Don’t ask options on launch executable file”
- Mark option ”Open files with single click”
- Edit -> Preferences -> Volume management:
- Un-Mark option ”Show available options for removable media when they are inserted”
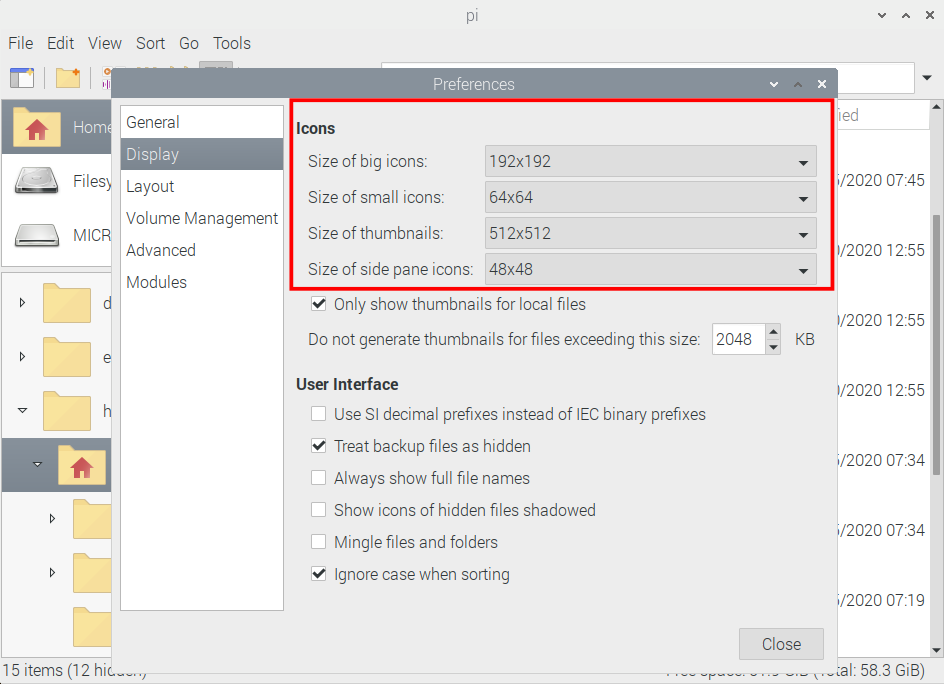
- Edit -> Preferences -> Display:
- Select larger size of icons (as shown in the picture)
2. If your phone is not recognized
If your phone is not recognized when plugged into USB port you might try to create udev rule for recognizing USB devices. To do this open terminal and type:
cd /etc/udev/rules.dsudo touch openauto.rulessudo nano openauto.rules
Then paste this text into opened file in nano editor:
SUBSYSTEM=="usb", ATTR{idVendor}=="*", ATTR{idProduct}=="*", MODE="0660", GROUP="plugdev"
Press “ctrl+x” to save the file and restart the Raspberry Pi.
3. If your screen resolution is wrong
sudo nano /boot/config.txt
hdmi_cvt=1024 600 60 3 0 0 0
hdmi_group=2 #(means DMT - Display Monitor Timings, the standard typically used by monitors)hdmi_mode=87 #(indicates the resolution mode we set before)hdmi_drive=2 #(selects the Normal HDMI mode)
4. If your phone is not charging during OpenAuto running
It is necessary to stress out that Raspberry can provide only 1200 mA current to all USB ports together, so there is the chance that your phone is discharging faster than charging with this limited current.
One solution for this can be to plug powered USB hub to Raspberry Pi, provide power to powered USB hub from some other USB power source (for example from the power distribution board shown in this article – it has still 2 spare USB power ports) and then plug your phone to the powered USB hub. The output current won’t be limited with Raspberry Pi 1200 mA, but with limit of your power supply.

Reviews
There are no reviews yet.